Common Gas Stove Issues and Their Solutions
Gas burner not lighting
The first common issue with most gas stoves is that the flame will not ignite. When this occurs, it might be for one of two causes. First and foremost, the ignition switch is broken. Second, no gas is passing through the valves.
To diagnose a problem with your gas stove, start by turning on the burner. Take note of two things. Did you hear a click when you turned on the ignition? Did you notice any gas escaping from the valves?
If you heard the click but did not smell the gas, the problem is with the flow of the gas. If you didn’t hear a click but smelled gas, the ignition switch is broken.
Low Flame
Slow heating may be a hassle and time-consuming in the kitchen, regardless of whether you have a gas stove or cooktop. The leading cause of slow flame heating is dirt or debris in some burner openings.
Unnecessary Clicking of Igniter
When the burner is switched on, the igniter clicks to give the gas flow a flame. However, if the clicking sound persists after the burner flame has been extinguished, there is a problem. A typical cause of unwanted igniter clicking is a blocked burner or a loose burner cap.
Noisy Burners
Due to the excessive air or gas flow through the valves, the flames on the burners might become boisterous. This can be dangerous since too much gas can spark a fire. Furthermore, the gas is squandered.
Gas Odor
Gas can sometimes leak from the gas or the pipelines. This can be dangerous. But, before you begin fixing it, make sure the burners are turned off. If you can smell gas even while the burners are turned off, the gas is leaking.
5 Simple Fixes
Fix #1 – Check the burner cap
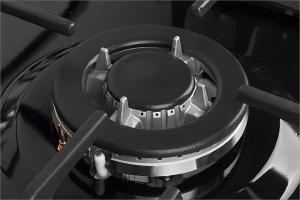
The burner cap on your gas burner must be properly aligned. If it is not, your gas burner may not light. This is because the gas cannot properly escape the burner.
To inspect the burner cap, follow these steps:
- Make sure your stove is not hot before inspecting the burner cap.
- Take the burner grate from your gas stovetop.
- Check that the gas burner cap is centred on the burner. If it isn’t, realign it.
- Replace the grate on your stove and test to see whether the gas burner can now light.
Fix #2 – Clean the burner
The next step is to apply if your gas burner isn’t lighting is to clean the burner. When excess moisture gets into or around the burner unit, the moisture can prevent it from igniting. This problem is usually caused by water overflowing from a pot or pan during cooking.
Follow these steps to clean the burner:
- Check that the burner unit is not hot.
- Remove the burner grate from your gas stove.
- Take off the burner cap.
- Examine the area surrounding the burner unit for any food debris. Remove any debris that you discover.
- Thoroughly clean the entire device with hot, soapy water and a towel. When cleaning the burner, ensure the cloth isn’t too damp to avoid getting water inside the unit.
- After cleaning, dry the burner unit. Allow it to air dry for about 20 minutes before replacing the lid and grate.
- Check that the burner knob is not impeded from rotating.
- Light the burner once it has been cleaned and dried. If it still does not light, go to the next step.
Fix #3 – Make sure the gas supply is working
The next step is to ensure that the gas supply is functional. If the gas supply line is accidently shut off or becomes clogged, your gas burner will not ignite because the gas flow has been interrupted.
Follow these steps to check the gas supply:
- Check that the burner unit is not hot.
- Remove the burner grate from your gas stove.
- Take off the burner cap.
- Look for a little hole at the rear of the burner where the gas enters. Make sure the hole is clear using a little toothpick or needle. Remove anything that is obstructing the hole.
- Attempt to light your burner. Check to see if you can smell gas coming from it. If you smell gas, proceed to the next repair. Check that all valves are switched on if you don’t smell gas. Turn on any of the valves that have been turned off. Check to see whether gas is coming from the burner now that all valves are turned on. If the gas still does not flow out of the burner, you must have a specialist examine your gas supply line.
- Continue to the following solution if the gas burner still does not ignite after completing all of the instructions in this fix.
Fix #4 – Check the spark igniter connections
The spark igniter helps in the ignition of the gas. Sometimes the connections on the spark igniter become faulty, preventing your gas burner from lighting.
Follow these steps to check the spark igniter connections:
- Turn off the power to your gas stove.
- Turn off the gas supply to your gas stove.
- Take off the burner head.
- Inspect the wires attached to the burner head for signs of damage. If the wires are frayed or otherwise damaged, they must be replaced.
- If the wiring is in good condition, check that the connections to the spark igniter are not frayed, broken, or loose. If so, they must be fixed or replaced. If the wiring is fine proceeded to the next step.
- After you’ve fixed or replaced the wiring, try lighting your gas burner. If it still won’t light, proceed to the next step.
Fix #5 – Replace the igniter unit
The final option is to replace the complete igniter device. The igniter is responsible for lighting your gas burner. Your gas burner will fail to ignite if it becomes faulty. Replacement igniters are inexpensive and can be found at most hardware and appliance stores (both online and offline).
To replace the igniter, follow these steps:
- Turn off the power.
- Turn off the gas supply.
- Remove the burner head from your stove.
- Find the igniter device and unplug the cabling.
- Remove the igniter by unscrewing the screws holding it in place.
- After removing the old igniter, replace and reinstall the screws to hold it in place.
- Reattach the igniter wires.
- Reinstall the burner head.
- Try to light your gas burner. If it still does not light, you must have a specialist examine your gas stove.
Conclusion
A gas stove is used regularly, but the difficulties cannot be ignored. These are some of the most frequent gas stove problems, which you can usually fix at home. However, don’t hesitate with gas pipes and supplies because they might be dangerous. It is preferable to seek professional assistance and hire specialists to complete the task.
ODM service
Looking for reliable camping stove supplier? At Deermaple, we specialize in ODM service, offering high-quality and innovative stoves tailored to your needs.
If you are interested in camping stove wholesale , please contact us.

