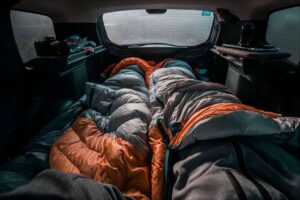
 Backpackers and outdoor lovers are always attempting to lose weight, particularly those who brand themselves ultralight backpackers. If you fit this description, you’ve come to the correct spot. Even a rocket stove weighs around one ounce, and the smallest isopropanol gas canister is eight ounces filled and four ounces empty. This little DIY camping stove is created from tin cans or, better yet, aluminum cans and weighs only a few grams. A litre of alcohol weighs approximately 0.75 percent more than a litre of water and may be kept in plastic bottles. You can carry less gasoline. You can’t get much lighter than that.
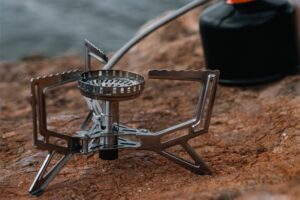
There are certain disadvantages to alcohol stoves. They produce less heat. The “normal” camping stove frequently includes a pot stand and, in some cases, a windshield. White gas stoves are ideal for extremely cold conditions (below 30°F). So, if your outdoor trip requires a pan of boiling water to survive, these DIY camp stoves are not for you. In windy weather, it might be difficult to get an open flame to boil a cooking pot of water. The little stoves may not pack as easily, but if you are cautious, they should last a long time. If not, you can construct a new stove while sitting in a shelter. Tear open a small or big can of beer and impress your trail companions by creating a DIY alcohol stove right in front of their eyes.
Getting Started
The simple tools you’ll need vary on your level of organization—mine is modest at home. When my stove goes out a thousand miles into a thru-hike, I’ll make due with whatever I have on hand. I used a marker, a brad (a small, sharp trim nail), vice grips, a heavy-duty razor blade, needle nose pliers, scissors, a cordless drill, and, depending on the design, 1/16″ and 3/16″ drill bits.
Materials
Alcohol will be required eventually, but you may begin using alcohol as one of the initial components. manufacturing empty beer cans is more enjoyable than manufacturing empty soda cans. However, playing with sharp metal, razor blades, and power tools is entirely up to the individual. You will need two cans with the same diameter. The diameter you use should correspond to the pot you have. If the cans are too large, the flame will be along the border of your pot rather than below it. Too tiny, and it becomes unstable.
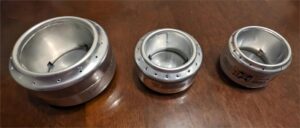
Below I have a large Foster’s style can (32 oz in this case), a regular 12 oz soda can, and one of the small 8 oz soda cans. Interestingly enough, the bottom of the can diameter of the small soda and regular soda are the same as the inner diameter of the recess.
Design
There are several designs available. Two that I know of used Coke cans, while another used a cat food or soup can (not discussed here). Both of the designs shown below will work nicely. One is somewhat lighter and easier to construct, especially if you’re out in the woods without the right tools. However, I like the other one only for aesthetic reasons. Construction is the same up to a point. The one on the right has a simpler design. The one on the left has a double wall, which looks cooler.
Accessories
Use the bottom of the large can for a snuffer, and use tin foil for windscreens.
Construction
To begin, chop up your Favorite beverage cans. Begin with a block of wood, a book, or any semi-hard surface measuring an inch to an inch-and-a-half high. Using this and a flat razor blade, score a line around the can. Hold the razor in position with one finger on top, the end overhanging the edge. With the other hand on top, carefully rotate the can while forcing it on the blade. If you run the can against the blade numerous times, scoring deeper each time, it will be much simpler to cut. In fact, scoring good enough and simply pressing down the line will cause the can to split apart. Pay attention to the sharp edges.
You will need two bottom parts. One will be the stove base, while the other will be the top with the jets. If you plan to create a double wall, set aside a top half. Score and divide two cans into the top and bottom halves. Alternatively, you may use a marker line and scissors.
The next step is to drill holes along the edge of the can. These will be your flame jets. I used the brad to dimple or start the holes. You do not need to use the drill on these. The idea is to have 16 uniformly spaced holes about 1/16th of an inch in diameter along the outside border of the recessed area of the bottom. The simplest approach to accomplish this is to mark the four opposing sides and then split the space between them again. This brings you to eight burner holes. Divide the area evenly again for the remaining holes, until you reach 16. Once marked with the brad, I return with the drill. Dimpling or piercing the can with a brad prevents the drill bit from wandering. This will be the upper section of the stove.
Simple Design
At this step, you must pick what sort of stove you want. I’ll describe both, beginning with the easier approach. Draw a line across the middle of the depression with a coin. Mark four holes on opposing sides of the line within the circle. Mark the center of a bigger hole. The four little holes along the edge measure 1/16 of an inch. The central hole measures 3/16 of an inch. This is where you’ll eventually pour your booze. They are not vent holes, but if there is airflow under your pot, it may receive too much oxygen and burn faster. If you place your pot squarely over these five holes, there will be no flame.
Next, use the needle tip pliers to bend the border of the bottom half. This will make it simpler to fit the two sections together. Now it’s only a question of connecting the two components. Even when only one side is kinked, it might be challenging. However, if you persevere, you will succeed. Then, press the two parts together, and you’re finished.
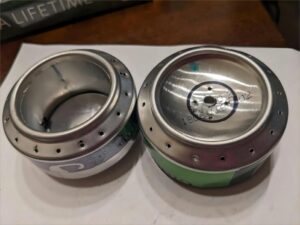
Double Wall Design
The second wall will make this somewhat heavier and more difficult to create, but is it worth it? Both can effectively boil a kettle of water. I suppose if you are a strict ultra lighter, this is a breach of the “rules.” Make everything as light as possible. This should also entail removing the paint from the cans, but that would be too much effort. As I already stated, I just prefer the appearance of the double wall. It does provide you one benefit. You can clearly see how much fuel is in the stove. The first few times will be trial and error in determining how much gasoline is required. The effectiveness of the stove is affected by factors such as elevation, temperature, water level, and wind. To score the recess inner diameter, use the bottom with 16 holes along the outside border. This is the thickest area of the can, and cutting off the center requires a lot of work. I used the blade displayed at the beginning, holding it in my fingers without a handle. I score it as hard as possible without injuring my fingers too much. Then, using the vice grips, I hold the blade and penetrate along the score. Again, if you score deep enough, the can will fall apart with some gentle prying with the blade. If not, cut and try to remain on the line as much as possible. This is the portion that would be extremely tough to do while on the route. I haven’t drilled the jets in the photo below.
Next, construct the double wall. Measure the can’s side while holding the two bottom halves together. When you combine them with the double wall, the wall will fit into the recess inside the container. Please see the photo below. This extra tiny bit of length must be added twice to the double wall length. This additional depth on a normal soda can is approximately one-fourth of an inch. If the outside of the can is one inch tall, the interior wall should be one and a half inches or higher. Simply make sure your double wall is tall enough to fit snugly both top and bottom when built.
Measure one and a half inches from the cut edge of the can’s top half. Mark a straight line around the can using the blade or marker and the stationary item you used for scoring before. The easiest method is to use scissors to cut straight up the can and along the line. Don’t use your partner’s favorite fabric scissors. You have been warned!
This results in a flat piece of metal that will overlap when fitted within the bottom half of the container. Leave a little overlap and cut any extra. Cut three notches in the strip, one where the overlap occurs, and fold the tab over. I fold it to the exterior to make the stove seem cleaner. Leave this tab open. You may cut off the other two tabs. Cut them to approximately an eighth of an inch broad and a quarter of an inch tall. Kink the bottom part as stated previously, then slip the two sections together. Make sure the inner wall fits snugly inside the center cutout and is flush with the top and bottom. It does not have to be completely airtight, but the closer it is, the better. To get flames out of the jets, the alcohol must evaporate between the walls, therefore big slots or a poor fit will not be effective.
Lighting the Stove
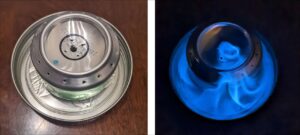
Alcohol burns significantly colder than other fuels. For this reason, you may dip your finger in alcohol, fire it, and use it to start the stove. I don’t advocate doing this because alcohol burns practically completely undetectable in daytime. It glows with a blue flame in the dark. Alcohol burns hot enough to burn you if not extinguished immediately, so don’t panic if you accidently start yourself on fire. Because it burns colder, it may take longer to bring your water to a boil.
Because the stove will not work properly until the alcohol vaporizes, and you won’t be able to see it burning, install a “drip tray” under the stove. You don’t want to start a wildfire by bumping it, but it isn’t the reason you need the drip tray. A lid from a pickle jar, jelly jar, or other container is also suitable. I took the metal cover off one of my girlfriend’s nice candles. It fits well in my Toaks 650mL pot and is lighter than a jar cover.
Fill the stove’s drip tray with roughly two teaspoons of denatured alcohol. Rubbing alcohol (99% isopropyl alcohol), HEET (antifreeze for fuel lines), and fuel tablets (hexamine) are also effective. At least one of these should be available at each gas station, pharmacy, or hardware shop. You can’t claim that about white fuel or isobutane cylinders.
Pour a little amount of liquid fuel into the drip tray and two teaspoons into the burner, then fire the drip tray. You simply need enough alcohol in the drip tray to burn for a minute or so. This raises the interior temperature of the burner high enough to evaporate the alcohol within.
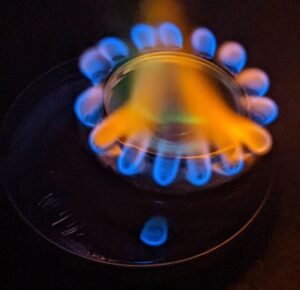
Once it achieves temperature, it will burn on its own, and the jets will operate without the need for more fuel in the drip tray. Two teaspoons of fuel should burn for 10 to 15 minutes. Before dealing with the stove, be sure that all of the fuel has been burned and that it is turned off. You may create a snuffer with a wider diameter can if you choose. This ensures that it is entirely out, and you may then preserve any remaining petrol by putting it back into your fuel container. A 750mL bottle should last around ten days, so plan your refills appropriately. Once the stove reaches the desired temperature and the surplus fuel has burned off, it is nearly identical to a gas burner on a standard cooktop, but without the dials or knobs. A flame is visible at the lower center of mine. I’m not going to worry about it, but if you want it to look better, either straighten out the metal or wrap it with high-temperature metal duct tape. Home Depot, Lowe’s, Menards, and even Ace Hardware will carry it. If you use a penny to plug the center hole, keep in mind that in mid-1982, the US Mint switched from all copper coins to copper-plated zinc blanks. Flip a 1982 penny in the air; if it’s copper, it will zing. If it clinks, it is copper. You do not have to be concerned if you were born before 1981. This appears to be what occurs when a zinc-based coin is set on fire for five minutes. This will not happen to a pure copper penny.
If you use a penny to plug the center hole, keep in mind that in mid-1982, the US Mint switched from all copper coins to copper-plated zinc blanks. Flip a 1982 penny in the air; if it’s copper, it will zing. If it clinks, it is copper. You do not have to be concerned if you were born before 1981. This appears to be what occurs when a zinc-based coin is set on fire for five minutes. This will not happen to a pure copper penny.